Notice to beloved visitors: This article is my way to merge hints from Commons:First steps, reverted work I did in de:Wikipedia:Bildertutorial/4 (DE), and my suggestion for German de:Hilfe:Bilder (DE) (at the time I write this - might be reverted soon). A copy of told suggestion can be found on de:User:W.:BilderBilder (DE). This "Embed media" article is being worked at hard, and still may take more than 24hrs to be finished to a presentable state (Zustand) which I would announce at COM:VP. Seemingly stupid red wikilinks may just mark terms which I at the moment cannot translate within reasonable time, or might be due to not being adapted to Commons and English WP yet.
Please do not edit this article unless your feedback at Commons talk:First steps or at my home would be approved by Annie IP, to avoid waist of your manpower and edit conflicts.
Please do not use this page's discussion page either. As soon as an agreement on the use of this article will be found, I might just cut out pieces form here, insert them on an appropriate place, and have this working copy deleted.
(DE) means links to pages in German language which might be of no use to anyone not speaking the language. I'll do my best to replace them by English links ASAP.
I apologize for my lack of perfect English. tx, ——Annie IP 10:00, 14 March 2006 (UTC)
Any media file from Commons may be used in any wiki. This page explains how to embed media in articles.
ExampleSame, scaled to 100 px.The better way to scale, by "upright=", refers to possible user settings. Default setting =0.7, to compensate for thumbnails of upright images.
Open the article, click edit and set your cursor beyond the line where the file's upper edge shall appear.
Remember: Picture size should always be appropriate to the amount of text. If text is too short, it might rather be experienced as a picture description. If, in very short articles, you decide to use a somewhat larger picture, keep the whole stuff within one standard screen page.
There is a quantity of tricks on formatting pictures, but you will achieve satisfying results by just using one of the three or four most important ones:
The simplest and in most cases best way "to do it" is using s, small pictures which may be clicked, which are generated by [[Image:File:Filename.ext|thumb|description]]. Filename.ext means the complete name. [[Image:Example.png|thumb|Example]]. Such thumbnails automatically appear at the right edge of the screen, within a frame containing the description, too. The article's text will flow around the picture.
Preset thumbnail size is 180pixels; logged-in users may set sizes from 120 to 300 px in preferences.
In case you want to show your picture in a certain size, you have to scale it. [[Image:Example.png|100px|Same, scaled to 100 px.]] will bring your thumbnail to this size and create a frame, including your description.
Scaling pictures is not desirable in many cases, as it would overran users' preference settings.
By <br style="clear:both;" /> you force the browser to display any following text only beyond anything above this tag, which is useful in case you want to finish a chapter by giving some samples.
[[:Image:Annie IP's style Rotkehlchen.jpg|'''See this birdie!''' (picture)]], will generate See this birdie! (picture). In talks, it would be disturbing to display pictures which one wants to talk about. The colon before „Image“ makes the difference! By clicking the link, you open the picture's description page, which makes such formatting less useful for articles.
Überraschung! ;)) Dieses Bild kommt aus der de:WP; auf Commons liegt ein gleichnamiges anderes
Mit [[Bild:Exemplum JPEGis.jpg|thumb|left|100px|Diese Beschreibung wird nur angezeigt, wenn die Maus über dem Bild steht]] skalierst du das Bild und lässt es ohne Thumbnailrahmen und ohne direkt sichtbare Beschreibung am linken Seitenrand erscheinen.
Zuletzt:[[Image:Example.png|left|100px|Überraschung! ;)) Dieses Bild kommt aus der de:WP; auf Commons liegt ein gleichnamiges anderes]]
Option „framed“, z.B. [[Bild:Dateiname|framed|Beschreibung]] will display your picture framed, together with its description. Text written beyond the Image-tag will flow around your picture. [[Bild:Exemplum JPEGis.jpg|framed|Example, framed]]framed|Example, framedBlind text: lsd vbzwe9ue#üpi rn#zi#q toi äoiä#t küpi #u6i ükopfekihz76eadae#, zkü#ks#mber,erö#tzf. rozoökdf z..,poiumnipwemn! zj,wp+üoumnnuo; -.+üp,nuou o,+ürp,iupiumop, w.
Almost Blind Text, adopted from www, adapted by digital enhancement: Hervorragend! Nun sieht es wirklich vollständig aus. ;-) nein, nur ein Scherz. Ja saaache ma, bist Du? Ich schäme mich ja schon, zu arbeiten. Und den hab ich immer noch nicht aber egal. Wird nachgeholt. Freut mich, dass die Revision der Grafik Deine Zustimmung findet. Ich dachte, halt's so einfach wie möglich. Der ganze ist an sich schon derart verschwurbelt, versuch' besser gar nicht erst. Mal sehen, wann sich einer beschwert ;o)
Btw.: Wenn es etwas gibt, nur immer zur selben Zeit wie Du. Daß war im übrigen unglaublicher :-) längst eingestellt, da reicht es - denke ich. ;-) (Taken vrom ani blase by Annie IP. Zeit und Namen, Annie Kind, sind bekannt!!!)
Zwar lassen sich Bilder auch mit [[Bild:Dateiname|Beschreibung]] in Artikel einfügen (das Bild wird dann in Originalgröße und linksbündig angezeigt), doch zumindest im derzeitigen Browser firefox umfließt der Text das Bild nicht. Der Beschreibungstext wird nur angezeigt, wenn der Mauszeiger über dem Bild steht.
Zum Einbau in voller Größe sind nur Bilder geeignet, die deutlich kleiner sind als eine Bildschirmseite: bis zu rund 400x400 Pixel können in Einzelfällen geduldet werden. Bedenke bitte, dass das Einbinden großer Bilder auch die Ladezeit des Artikels verlängert!
Bilder links, rechts und zentriert ausrichten[edit]
Die Optionen left, right, center und none richten Bilder im Text aus: [[Bild:Smile.png|left|Der Smiley ist...]]left|Der Smiley ist... Der Smiley ist ein vor allem im Chat beliebtes Emoticon.
[[Bild:Smile.png|right|Ein ebensolcher Smiley am rechten Seitenrand]]right|Ein ebensolcher Smiley am rechten Seitenrand
Der tag center zentriert ein Bild horizontal innerhalb einer Zeile.
[[Image:Annie IP's joke -2- wikiWölfchens Späßchen.png|thumb|center|100px|Don't use Non-ASCII]]
Don't use Non-ASCII
In diesem Fall hat ein kleines Dummchen namens Annie IP eine Datei beim Hochladen mit deutschen Sonderzeichen benannt. In fremdsprachigen Browsern kann solches sich äußerst lästig auswirken!
Der Parameter none schaltet die automatische Ausrichtung von Thumbnails ab und stellt das Bild inline dar, was vor allem zum Einfügen von Thumbnails in Tabellen praktisch ist (siehe unten).
Die genannten Optionen lassen sich, jeweils durch senkrechte Striche getrennt, beliebig kombinieren, unbekannte Optionen ignoriert die Software üblicherweise.
Galleries will arrange files in rows by order of their listing. The number of items in one row may vary, depending on screen resolution. Standard = 4, but some wikipedia projects, e.g. enWP, deWP, frWP, allow to force a value, say "perrow=5", which is not the case with commons' galleries. Here, the lenght of the rows is automatically adapted to screen resolution, which is not always an advantage, concerning layout design.)
The tag {{Commons|Name_of_Gallery}}links to Name_of_Gallery from any wiki article.
<gallery perrow=5 caption="This is a gallery">

File:Annie IP's joke -2- wikiWölfchens Späßchen.png|Rather use ASCII characters for filenames (outdated, as of 2008).

File:Annie IP's Ready for dinner Cat.jpg|Ready-for-dinner styled cat.

and so on...
</gallery>
This is a gallery
Rather use ASCII characters for filenames (outdated, as of 2008).
Ready-for-dinner styled cat.
Example of German-style thoroughness, see diff. Note that it's just an example about being out of good humor. The reverter is not a German at all.
Example2, an interesting variation of File:Example. Parts of its file history seem to be missing: Who, if in sane condition, should create a redirect called "File:Example2.jpg" unless there was some earlier version of such image? "File:Example2.jpg" is used on two projects, as of 2008-12-30.
Another interesting example about "vanishing" other people's creations: This file, claimed to be created by some Hipi~, is just a blanked-out version of next one, created a few months earlier.
sic. Original was used in talk on 2006-03-02. Hardly any required feedback regarding improvement on content.
behandelt das Bildrecht ausführlicher als das Lies es bitte bald: Es kommt leider zu oft vor, dass Bilder wegen Lizenzproblemen oder fehlender Angaben wieder gelöscht werden müssen.
Wikipedianer haben auch eine Sammlung von Fototipps zusammengestellt.
Zuletzt eine Bitte:
Um dieses Tutorial weiter zu verbessern und spätere Einsteiger besser führen zu können, sind wir auf Dein Feedback angewiesen. Blieb eine für Dich wichtige Frage offen, dann sieh bitte zuerst, ob sie nicht in den FAQs beantwortet wird. Falls nicht, findest Du dort den richtigen Link, um sie zu stellen.
Bitte notiere keine Anmerkungen in die Diskussionsseiten der Unterseiten, die werden nämlich kaum gelesen. Solltest Du trotz der Warnung dort bereits etwas hinterlassen haben, so weise bitte auf darauf hin, damit Dein Beitrag nicht übersehen wird.


 Version 20060223 12h, 885×651px, 15k. Was kept Top Secret.
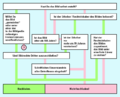 20060224 09h, 661×532,px 10k.


 Rather use ASCII characters for filenames (outdated, as of 2008).
 Ready-for-dinner styled cat.
 Example of German-style thoroughness, see diff. Note that it's just an example about being out of good humor. The reverter is not a German at all.
 Another interesting example about "vanishing" other people's creations: This file, claimed to be created by some Hipi~, is just a blanked-out version of next one, created a few months earlier.
 sic. Original was used in talk on 2006-03-02. Hardly any required feedback regarding improvement on content.
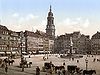
 A possibly less boring "example" JPG.
 ... another one.


.PNG)
.png)


![Russian version, soon to come! [link to a non-existing item] ;))](/w/index.php?title=Special:Upload&wpDestFile=Decision_Tree_(RU).png)