Category:Photographs by Troy Cryder
Jump to navigation
Jump to search
Troy Cryder, a NASA Kennedy photographer
Media in category "Photographs by Troy Cryder"
The following 126 files are in this category, out of 126 total.
-
 Aerial view of CCAFS Industrial Area (KSC-2009-5007).jpg 3,000 × 1,932; 3.92 MB
-
 Air Force HH-60G Pave Hawk 26236 during NASA rescue drill.jpg 3,000 × 2,000; 3.79 MB
-
 Atlantis (foreground) sits on Launch Pad A and Endeavour on Launch Pad B.jpg 2,000 × 3,000; 3.97 MB
-
 Atlantis (STS-125) and Endeavour (STS-400) on launch pads.jpg 2,946 × 1,919; 1.78 MB
-
 Atlantis at the pad 2.jpg 2,000 × 3,008; 742 KB
-
 Atlantis at the pad.jpg 3,000 × 1,965; 762 KB
-
 Atlantis SRB et ET.jpg 2,000 × 3,008; 733 KB
-
 Atlantis09202008.jpg 1,823 × 3,000; 3.65 MB
-
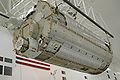
 Backside of the Kepler space telescope.jpg 2,008 × 3,000; 2.46 MB
-
 Chelonia mydas, head, juvenile.jpg 3,000 × 2,000; 2.3 MB
-
 Constellation Launch Pad 39B.jpg 3,000 × 2,000; 4.92 MB
-
 Constellation Launch-Pad 39B.jpg 3,000 × 2,000; 4.81 MB
-
 Delta II Heavy booster placement.jpg 2,008 × 3,000; 3.07 MB
-
 Delta IV Medium+ 4,2 on Launch Pad 37B.jpg 3,000 × 2,000; 1.12 MB
-
 Delta IV Medium+ 4,2 with GOES P on Launch Pad 37B.jpg 1,959 × 3,000; 929 KB
-
 Delta IV with GOES P on Launch Pad 37B.jpg 543 × 720; 310 KB
-
 Discovery Launch Pad 39A.jpg 3,000 × 2,023; 4.05 MB
-
 DiscoveryRollout STS-124.jpg 3,000 × 2,008; 4.39 MB
-
 GLAST and NASA Logos at the Delta II Heavy.jpg 2,008 × 3,000; 3.66 MB
-
 Go Atlantis!.jpg 3,008 × 2,000; 485 KB
-
 GOES O before loading oxidizer and hydrazine.jpg 2,008 × 3,000; 3.25 MB
-
 GOES-O before oxidizer and hydrazine loading.jpg 2,008 × 3,000; 2.77 MB
-
 GOES-P.jpg 2,000 × 3,000; 2.84 MB
-
 Huge overhead cranes hoist JEM in the SSPF.jpg 3,000 × 1,995; 1.21 MB
-
 JEM in November 2006.jpg 3,000 × 1,995; 508 KB
-
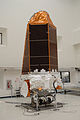 Kepler in Astrotech's Hazardous Processing Facility (KSC-2009-1430).jpg 2,008 × 3,000; 2.75 MB
-
 Kepler in Astrotech's Hazardous Processing Facility (KSC-2009-1645).jpg 1,804 × 2,008; 1.89 MB
-
 Kepler put with a crane to the third stage of its Delta II.jpg 2,000 × 3,250; 3.25 MB
-
 Kepler space telescope seen fom downside.jpg 3,000 × 2,008; 2.74 MB
-
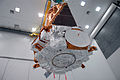
 Kepler space telescope shortly after the assembly to the third stage.jpg 2,008 × 3,000; 3.05 MB
-
 KSC-2009-2497 orig.jpg 3,000 × 2,008; 1.2 MB
-
 KSC-2009-2501 orig.jpg 2,008 × 3,000; 846 KB
-
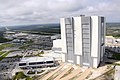 Launch Control Center and Vehicle Assembly Building.jpg 3,000 × 2,000; 4.19 MB
-
 Liberty Star and Freedom Star at Hangar AF 01.jpg 2,000 × 3,000; 4.28 MB
-
 Liberty Star and Freedom Star at Hangar AF 02.jpg 3,000 × 2,000; 4.73 MB
-
 Logos an einer Raketenstufe.jpg 2,000 × 3,008; 653 KB
-
 MMRTG.jpg 2,000 × 3,000; 3.84 MB
-
 Mobile Launcher assembly 06.jpg 3,000 × 2,000; 5.35 MB
-
 MPLM move to payload canniste.jpg 3,000 × 2,000; 3.75 MB
-
 NASA Launch Control Center.jpg 3,000 × 2,000; 4.24 MB
-
 Roulle sous les lumières.jpg 3,008 × 2,000; 366 KB
-
 Soft Capture Mechanism.jpg 720 × 482; 395 KB
-
 Solar power system at Kennedy Space Center.jpg 3,000 × 2,000; 4.88 MB
-
 Sortant du VAB.jpg 2,013 × 3,000; 683 KB
-
 Space Shuttle Discovery launches on STS-133 from Kennedy Space Center.jpg 2,000 × 3,000; 535 KB
-
 Space Shuttle Discovery launches on STS-133, February 2011.jpg 2,000 × 3,000; 620 KB
-
 Space shuttles Atlantis (STS-125) and Endeavour (STS-400) on launch pads edit.jpg 2,928 × 1,909; 3.1 MB
-
 Space shuttles Atlantis (STS-125) and Endeavour (STS-400) on launch pads.jpg 2,968 × 1,950; 1.67 MB
-
 Spacehab Logistics Single Module prepared prior to STS-116 (KSC-06pd2442).jpg 3,008 × 2,000; 960 KB
-
 Spacehab Logistics Single Module prepared prior to STS-116 (KSC-06pd2443).jpg 2,000 × 3,008; 884 KB
-
 STS 133 Discovery On Launch Pad 39A Following Retraction Of Rotating Service Structure.jpg 3,000 × 2,000; 1.07 MB
-
 STS 133 GUCP Quick Disconnect removal.jpg 3,000 × 2,000; 3.65 MB
-
 STS 133 gucp replacement.jpg 2,000 × 3,000; 4.18 MB
-
 STS-117 Hard Down.jpg 2,803 × 1,891; 603 KB
-
 STS-117 second rollout.jpg 3,008 × 2,000; 457 KB
-
 STS-119 Discovery and crawler at dawn.jpg 2,613 × 1,960; 362 KB
-
 STS-119 Discovery moving.jpg 2,008 × 3,000; 3.55 MB
-
 STS-120 Mating.jpg 2,000 × 3,008; 571 KB
-
 STS-125 and STS-400 on the two Launch Pads.jpg 3,000 × 2,000; 3.94 MB
-
 STS-128 Discovery.jpg 2,000 × 3,000; 3.42 MB
-
 STS-129 Atlantis Ready to Start.jpg 2,387 × 3,000; 4.12 MB
-
 STS-129 External Tank.jpg 3,000 × 2,000; 3.54 MB
-
 STS-129 Orbiter Atlantis Sling.jpg 3,000 × 2,000; 3.07 MB
-
 STS-129 Payload Changeout Room 1.jpg 2,000 × 3,000; 3.05 MB
-
 STS-129 Payload Changeout Room 2.jpg 2,000 × 3,000; 4.35 MB
-
 STS-130 Endeavour launch pad.jpg 2,000 × 3,000; 2.77 MB
-
 STS-131 Discovery Inside VAB2.jpg 2,000 × 3,000; 3.7 MB
-
 STS-131 Discovery Inside VAB3.jpg 2,000 × 3,000; 3.68 MB
-
 STS-131 launching.jpg 3,000 × 2,032; 2.97 MB
-
 STS-132 ET-136 Mar10.jpg 3,000 × 2,000; 886 KB
-
 STS-132 ET136 emerges from Pegasus.jpg 3,000 × 2,000; 1.22 MB
-
 STS-132 MRM1 Astrotech2.jpg 3,000 × 2,000; 4 MB
-
 STS-132 MRM1 Astrotech6.jpg 3,000 × 2,000; 3.53 MB
-
 STS-132 MRM1 Astrotech7.jpg 2,000 × 3,000; 3.66 MB
-
 STS-132 MRM1 Docking Mechanism.jpg 3,000 × 2,080; 4.44 MB
-
 STS-132 MRM1 Mar2010.jpg 3,000 × 2,158; 4.4 MB
-
 STS-132 window8 removal prep.jpg 720 × 482; 336 KB
-
 STS-133 (Discovery) on Launch Complex 39A.jpg 2,000 × 3,000; 1.8 MB
-
 STS-133 A nozzle exit cone for a SRB inside a railway car.jpg 3,000 × 2,000; 3.8 MB
-
 STS-133 hydrogen vent line.jpg 2,000 × 1,500; 511 KB
-
 STS-133 repair of foam and stringer cracks.jpg 1,602 × 2,404; 1.47 MB
-
 STS-133 Space Shuttle Discovery lifts off 1.jpg 3,000 × 2,000; 690 KB
-
 STS-134 launch 1.jpg 3,000 × 2,000; 2.36 MB
-
 STS-134 launch 2.jpg 3,000 × 2,000; 2.5 MB
-
 STS-134 launch 3.jpg 3,000 × 2,000; 3.04 MB
-
 STS-134 launch 4.jpg 3,000 × 2,000; 2.99 MB
-
 STS-134 the sun rises for the second launch attempt.jpg 3,000 × 2,000; 2.74 MB
-
 STS-135 Atlantis is lowered into high bay.jpg 3,000 × 2,000; 4.66 MB
-
 STS-135 Atlantis lowered into the MLP.jpg 1,801 × 3,000; 3.74 MB
-
 STS131 Discovery Inside VAB6.jpg 3,000 × 2,000; 3.66 MB
-
 STS131 Discovery Inside VAB7.jpg 3,000 × 2,000; 4.11 MB
-
 STS131 Discovery-inside VAB1.jpg 2,000 × 3,000; 3.59 MB
-
 STS131-Discovery Inside VAB5.jpg 3,000 × 2,000; 3.71 MB
-
 STS131-Discovery-Inside VAB4.jpg 2,000 × 3,000; 3.36 MB
-
 STS131-Discovery-Inside VAB9.jpg 2,000 × 3,000; 3.96 MB
-
 STS132 Antonelli Good Mar10.jpg 3,000 × 2,000; 4.14 MB
-
 STS132 ET-136.jpg 2,000 × 3,000; 977 KB
-
 STS132 ET136 insideVAB1.jpg 3,000 × 2,000; 963 KB
-
 STS132 ICC VLD Mar10.jpg 3,000 × 2,000; 4.13 MB
-
 STS132 Main Engine Installantion3.jpg 3,000 × 2,000; 4.94 MB
-
 STS132 main engine installation.jpg 3,000 × 2,000; 4.72 MB
-
 STS132 main engine-installation4.jpg 3,000 × 2,000; 4.2 MB
-
 STS132 main engine-installation5.jpg 3,000 × 2,000; 3.89 MB
-
 STS132 Main Engine1.jpg 3,000 × 2,000; 3.47 MB
-
 STS132 Main Engine2.jpg 3,000 × 2,000; 4.19 MB
-
 STS132 mainengine installation2.jpg 3,000 × 2,000; 4.19 MB
-
 STS132 MRM1 Astrotech1.jpg 3,000 × 2,065; 4.34 MB
-
 STS132 MRM1 Mar10.jpg 3,000 × 2,000; 4.23 MB
-
 STS132 MRM1 March2010.jpg 3,000 × 2,000; 3.95 MB
-
 STS132 MRM1-Astrotech3.jpg 3,000 × 2,000; 3.9 MB
-
 STS132 Sellers MRM1.jpg 3,000 × 2,066; 3.99 MB
-
 STS132 SSME installation1.jpg 3,000 × 2,000; 4.95 MB
-
 STS132 TCDT Apr2.jpg 2,201 × 3,000; 801 KB
-
 STS132-ET136 Arrival2.jpg 3,000 × 2,000; 1.03 MB
-
 STS132-MRM1 Astrotech4.jpg 3,000 × 2,031; 4.01 MB
-
 STS132-MRM1 Astrotech5.jpg 3,000 × 2,000; 3.29 MB
-
 Technician ist tighten a heavy booster to the Delta II first stage.jpg 3,000 × 2,008; 2.2 MB
-
 Technicians between heavy booster and Delta II first stage.jpg 2,008 × 3,000; 3.42 MB
-
 Technicians check the working lists after mating the nine boosters.jpg 3,000 × 2,008; 3.41 MB
-
 The 348th Delta rocket on Launch Pad 37B.jpg 2,000 × 3,000; 892 KB
-
 THEMIS before lifting it on the third stage of its Delta II 7925.jpg 2,000 × 3,008; 405 KB
-
 THEMIS satellites are installed on the Delta II third stage.jpg 2,000 × 3,008; 474 KB
-
 THEMIS satellites on the probe carrier lowered toward the Delta II third stage.jpg 2,000 × 3,008; 541 KB
-
 THEMIS under cover on the third stage of an Delta II 7925.jpg 2,000 × 3,008; 572 KB
-
 Upper cylindrical transport canister is guided toward THEMIS.jpg 2,000 × 3,008; 462 KB
-
 Upper cylindrical transport canister is lowered toward THEMIS.jpg 2,000 × 3,008; 418 KB
.jpg)

_sits_on_Launch_Pad_A_and_Endeavour_on_Launch_Pad_B.jpg)
_and_Endeavour_(STS-400)_on_launch_pads.jpg)


.jpg)
.jpg)


_and_Endeavour_(STS-400)_on_launch_pads_edit.jpg)
_and_Endeavour_(STS-400)_on_launch_pads.jpg)
.jpg)
.jpg)


_on_Launch_Complex_39A.jpg)


