Category:Goldswil
Jump to navigation
Jump to search
village and former municipality in Ringgenberg in the canton of Bern, Switzerland   | |||||
| Upload media | |||||
| Instance of | |||||
|---|---|---|---|---|---|
| Location | Ringgenberg, Interlaken-Oberhasli administrative district, Oberland administrative region, Bern, Switzerland | ||||
 | |||||
Subcategories
This category has the following 3 subcategories, out of 3 total.
Media in category "Goldswil"
The following 52 files are in this category, out of 52 total.
-
 5643 - Schynige Platte - View of Interlaken.JPG 3,648 × 2,736; 2.22 MB
-
 5824-5828 - Schynige Platte - View over Brienzersee.jpg 15,457 × 2,704; 8.59 MB
-
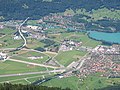 5836 - Schynige Platte - Interlaken Ost, Bönigen, Goldswil.JPG 3,648 × 2,736; 3.03 MB
-
 5857-5860 - Schynige Platte - Brienzersee viewed from Oberberghorn.jpg 13,884 × 2,652; 6.45 MB
-
 5874 - Schynige Platte - Paragliding over Interlaken.jpg 2,736 × 3,648; 2.22 MB
-
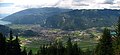 5877-5878 - Schynige Platte - Interlaken, Matten, Goldswil.jpg 5,845 × 2,660; 2.33 MB
-
 5884 - Goldswil-Ringgenberg - View from Brienzersee.JPG 3,648 × 2,736; 2.86 MB
-
 5885 - Goldswil-Ringgenberg - View from Brienzersee.JPG 3,648 × 2,736; 3.35 MB
-
 Alt Goldswil.JPG 2,230 × 1,515; 938 KB
-
 Burgseeli Goldswil Ringgenberg 1.jpg 2,272 × 1,704; 1.65 MB
-
 Burgseeli Goldswil Ringgenberg 2.jpg 1,704 × 2,272; 2.28 MB
-
 CH-NB - Brienzersee, Aareausfluss von Westen mit Blick auf Ringgenberg - Collection Gugelmann - GS-GUGE-LORY-A-1.tif 6,260 × 4,680, 2 pages; 83.84 MB
-
 CH-NB - Brienzersee, Ausfluss der Aare mit gedeckter Holzbrücke - Collection Gugelmann - GS-GUGE-WETZEL-C-6.tif 5,700 × 4,271, 2 pages; 69.67 MB
-
 CH-NB - Interlaken und Unterseen, von Nordosten - Collection Gugelmann - GS-GUGE-BLEULER-B-2.tif 6,142 × 4,388, 2 pages; 77.13 MB
-
 CHE Goldswil COA.svg 513 × 633; 16 KB
-
 CHE Goldswil Flag.svg 600 × 600; 15 KB
-
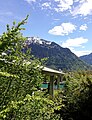
 Goldswil (5395020870).jpg 1,000 × 750; 330 KB
-
 Goldswil Dorfeingang West - im Hintergrund Widerlager Nord Goldswil-Viadukt.jpg 4,223 × 3,028; 4.83 MB
-
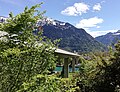
 Goldswil in winter.jpg 3,072 × 2,304; 2.35 MB
-
 Goldswil-bei Ringgenberg-Bödeli-Berner Oberland 1.jpg 2,194 × 978; 1.36 MB
-

-
 Goldswil-Viadukt Fahrbahn mit Blick in Richtung Interlaken.jpg 3,456 × 4,608; 4.32 MB
-
 Goldswil-Viadukt Hauptstrasse Richtung Goldswil.jpg 4,509 × 3,196; 4.28 MB
-
 Goldswil-Viadukt in Richtung Interlaken 6.jpg 4,510 × 3,300; 3.74 MB
-
 Goldswil-Viadukt in Richtung Interlaken 6b.jpg 3,179 × 2,001; 1.65 MB
-
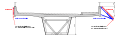
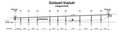 Goldswil-Viadukt Längsschnitt - Longitudinal section.png 3,241 × 945; 117 KB
-
 Goldswil-Viadukt Längsschnitt - Longitudinal section.svg 3,000 × 600; 41 KB
-
 Goldswil-Viadukt mit Aare (hochformat) 1.jpg 3,266 × 4,416; 3.91 MB
-
 Goldswil-Viadukt mit Aare + Schiff.jpg 4,457 × 3,299; 4.97 MB
-
 Goldswil-Viadukt mit Aare 2.jpg 3,903 × 2,677; 4.14 MB
-
 Goldswil-Viadukt mit Aare und Hardergrat 2.jpg 4,235 × 3,220; 4.12 MB
-
 Goldswil-Viadukt mit Aare und Hardergrat 4.jpg 3,456 × 4,608; 4.19 MB
-
 Goldswil-Viadukt mit Aare und Hardergrat.jpg 4,477 × 3,285; 5.23 MB
-
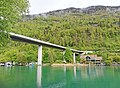
 Goldswil-Viadukt mit Aare.jpg 3,903 × 2,677; 3.99 MB
-
 Goldswil-Viadukt mit Interlaken 1.jpg 3,515 × 2,618; 2.81 MB
-
 Goldswil-Viadukt mit Interlaken 2.jpg 2,848 × 3,728; 3.53 MB
-
 Goldswil-Viadukt mit Interlaken.jpg 4,015 × 3,086; 4.14 MB
-
 Goldswil-Viadukt Panorama mit Blick auf Interlaken 2.jpg 3,456 × 4,608; 5.38 MB
-

-
 Goldswil-Viadukt Panorama mit Interlaken im Hintergrund 2.jpg 4,515 × 3,333; 4.17 MB
-
 Goldswil-Viadukt Panorama mit Interlaken im Hintergrund 3.jpg 4,608 × 3,456; 6.2 MB
-
 Goldswil-Viadukt Panorama mit Interlaken im Hintergrund 4.jpg 5,390 × 2,939; 4.16 MB
-
 Goldswil-Viadukt Panorama von Goldswil aus in Richtung Interlaken.jpg 4,521 × 3,322; 3.32 MB
-
 Goldswil-Viadukt Querschnitt Photovoltaikprojekt ohne Bauprojekttitel.png 8,059 × 3,398; 580 KB
-
 Goldswil-Viadukt Querschnitt Photovoltaikprojekt seitenverkehrt.png 8,059 × 3,398; 577 KB
-
 Goldswil-Viadukt Querschnitt Photovoltaikprojekt.png 8,059 × 3,398; 696 KB
-
 Goldswil-Viadukt Querschnitt Photovoltaikprojekt.svg 2,900 × 900; 8 KB
-
 Goldswil-Viadukt Querschnitt.png 6,896 × 2,877; 410 KB
-
 Goldswil-Viadukt vom Widerlager Nord aus gesehen.jpg 4,608 × 3,456; 4.58 MB
-
 Goldswil-Viadukt Widerlager Nord mit Unterführung Eyenweg.jpg 4,267 × 3,185; 4.01 MB
-
 Goldswil-Viadukt, Ansicht Fahrbahn-Unterseite und Hohlkasten 2.jpg 3,456 × 3,304; 2.4 MB
-
 Goldswil-Viadukt, Ansicht Fahrbahn-Unterseite und Hohlkasten.jpg 3,456 × 4,608; 3.82 MB


.jpg)


_1.jpg)


