Category:Aircraft in the East Riding of Yorkshire
Jump to navigation
Jump to search
Media in category "Aircraft in the East Riding of Yorkshire"
The following 138 files are in this category, out of 138 total.
-
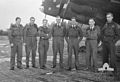 10 Squadron RAF Halifax aircrew AWM P04218.002.jpg 450 × 309; 21 KB
-
 102 Squadron Halifax at RAF Pocklington WWII IWM CH 10776.jpg 800 × 548; 43 KB
-
 1663 HCU.jpg 600 × 361; 53 KB
-
 2012년 6월 공군 블랙이글스 영국비행 (7482998954) (2).jpg 2,953 × 1,669; 579 KB
-
 2012년 6월 공군 블랙이글스 영국비행 (7482998954).jpg 2,953 × 1,669; 2.22 MB
-
 458 Squadron RAAF aircrew Dec 1941 AWM P05660.001.jpg 640 × 401; 170 KB
-
 458 Squadron RAAF Wellington aircrew 1942 AWM SUK10282.jpg 330 × 467; 86 KB
-
 458 Squadron RAAF Wellington aircrew Dec 1941 AWM P00631.003.jpg 571 × 343; 147 KB
-
 458 Squadron RAAF Wellington maintenance 1942 AWM SUK10283.jpg 450 × 316; 16 KB
-
 458 Squadron RAAF Wellington rear gun turret 1942 AWM SUK10136.jpg 450 × 319; 14 KB
-
 458 Squadron RAAF Wellingtons 1942 AWM SUK10279.jpg 450 × 316; 11 KB
-
 462 Squadron RAAF Halifax at Driffield AWM UK2232.jpg 450 × 338; 20 KB
-
 462 Squadron RAAF Halifax at Driffield AWM UK2420.jpg 450 × 338; 16 KB
-
 462 Squadron RAAF Halifax Mk II engine maintenance AWM SUK12129.jpg 450 × 338; 26 KB
-
 462 Squadron RAAF Halifaxes in hangar at Driffield AWM UK2340.jpg 450 × 336; 18 KB
-
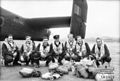
 466 Sqn Halifax crew.jpg 450 × 299; 50 KB
-
 466 Squadron Halifax aircrew at Driffield AWM UK1919.jpg 450 × 305; 21 KB
-
 466 Squadron Halifax aircrew at RAF Leconfield Jan 1944 AWM UK0959.jpg 640 × 480; 183 KB
-
 466 Squadron RAAF Halifax aircrew at Leconfield AWM UK0961A.jpg 450 × 329; 19 KB
-
 466 Squadron RAAF Halifax aircrew at Leconfield AWM UK0965A.jpg 450 × 299; 20 KB
-
 466 Squadron RAAF Halifax aircrew at Leconfield SUK12130.jpg 450 × 338; 19 KB
-
 466 Squadron RAAF Halifax at Leconfield AWM UK0965.jpg 450 × 327; 16 KB
-
 466 Squadron RAAF Halifax at Leconfield UK0953.jpg 450 × 339; 14 KB
-
 466 Squadron RAAF Halifax at RAF Driffield AWM UK1912.jpg 450 × 334; 14 KB
-
 466 Squadron RAAF Halifax at RAF Leconfield AWM UK0966.jpg 450 × 334; 19 KB
-
 466 Squadron RAAF Halifax crew at Leconfield AWM UK0959.jpg 450 × 328; 23 KB
-
 466 Squadron RAAF Halifax crew Leconfield AWM UK0958.jpg 450 × 313; 24 KB
-
 466 Squadron RAAF Halifax Kellys Gang AWM UK2630.jpg 640 × 499; 177 KB
-
 466 Squadron RAAF Halifax landing at Driffield AWM UK1909.jpg 450 × 342; 14 KB
-
 466 Squadron RAAF Halifax maintenance at Leconfield AWM UK0963.jpg 450 × 321; 22 KB
-
 466 Squadron Wellington crew RAF Leconfield 1943 IWM CH 11173.jpg 800 × 617; 64 KB
-
 640 Squadron RAF Leconfield Dec 1944.JPG 1,818 × 1,206; 464 KB
-
-
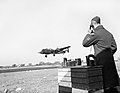
 Air ambulance takes off, Hull - geograph.org.uk - 4506390.jpg 640 × 477; 197 KB
-

-

-
 Aircraft of the Royal Air Force, 1943 HU69095.jpg 800 × 578; 64 KB
-
 Airfield at Mount Airy - geograph.org.uk - 1069306.jpg 640 × 480; 54 KB
-
 Airfield West of Leven - geograph.org.uk - 145875.jpg 640 × 480; 55 KB
-

-
 Armstrong Whitworth Whitley ExCC.jpg 649 × 496; 118 KB
-
-
 Avro Vulcan Near Breighton.jpg 240 × 192; 2 KB
-
 Beware of cows on the airfield Hollym (geograph 4582513).jpg 640 × 427; 50 KB
-
 Beware of cows on the airfield Hollym (geograph 4582524).jpg 640 × 427; 54 KB
-
 Bombing up 466 Squadron RAAF Halifax at Leconfield AWM UK0968.jpg 450 × 333; 19 KB
-
 Bombing up 51 Squadron Halifax at RAF Snaith WWII IWM CH 11622.jpg 800 × 615; 46 KB
-
 Bombing up a 466 Squadron RAAF Halifax at Leconfield AWM UK0967.jpg 450 × 321; 23 KB
-
 Breighton Airfield and Aeroplane Museum.jpg 640 × 480; 93 KB
-
 Dywizjon 303 in color.jpg 1,596 × 1,100; 1,012 KB
-
 Dywizjon 303.jpg 1,596 × 1,100; 999 KB
-

-
 Fly-in at Full Sutton Aerodrome (geograph 4606817).jpg 640 × 427; 54 KB
-
 Fly-in at Full Sutton Aerodrome (geograph 4606826).jpg 640 × 427; 44 KB
-
 Fly-in at Full Sutton Aerodrome (geograph 4606830).jpg 640 × 427; 47 KB
-
 Fort Paull (geograph 5055151).jpg 1,024 × 683; 164 KB
-
 Fort Paull 2-5-11 IMG 1831.jpg - panoramio.jpg 1,200 × 799; 434 KB
-
 Fort Paull Air Museum - geograph.org.uk - 856496.jpg 640 × 415; 35 KB
-
 Halifax automatic pilot maintenance WWII IWM CH 6607.jpg 800 × 541; 59 KB
-
 Halifax nose art Friday the 13th IWM CH 14589.jpg 800 × 611; 46 KB
-
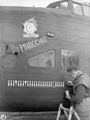
 Halifax nose art Pinocchio April 1943 IWM CH 9331.jpg 598 × 800; 48 KB
-
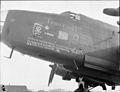
 Halifax nose art Ruhr Valley Express IWM CH 6614.jpg 800 × 530; 39 KB
-
 Handley Page Halifax CH14526.jpg 800 × 616; 59 KB
-

-

-

-
 HMA R 23 Airship With Camel N6814.jpg 600 × 613; 113 KB
-
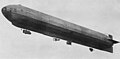 HMA R 23 Airship With Camel.jpg 600 × 296; 49 KB
-
 Hollym Airfield (geograph 2406990).jpg 3,648 × 2,736; 1.72 MB
-
 Hull Aero Club - geograph.org.uk - 1552294.jpg 640 × 480; 49 KB
-

-

-

-
 Loading gun ammunition in Halifax WWII IWM CH 6640.jpg 800 × 540; 61 KB
-
 Mustangs Flying During Breighton Airshow.jpg 3,456 × 2,304; 1.72 MB
-

-

-

-
 Percival Mew Gull in flight.jpg 800 × 545; 271 KB
-
 Piloci 303 (cropped).jpg 62 × 80; 26 KB
-
 Piloci 303.jpg 2,470 × 1,772; 1.3 MB
-

-

-
 R23WithSopwithCamelWWI.jpg 800 × 434; 31 KB
-
 RAF Bomber Command 1940 HU104760.jpg 630 × 800; 38 KB
-
 RAF Bomber Command 1940 HU104764.jpg 800 × 596; 43 KB
-
 RAF Bomber Command 1940 HU104765.jpg 800 × 594; 47 KB
-
 RAF Bomber Command 1940 HU104767.jpg 800 × 601; 51 KB
-
 RAF Bomber Command 1940 HU104768.jpg 800 × 620; 45 KB
-
 RAF Bomber Command 1940 HU104769.jpg 800 × 587; 48 KB
-
 RAF Bomber Command 1940 HU104770.jpg 800 × 582; 48 KB
-
 RAF Bomber Command HU104766.jpg 800 × 590; 54 KB
-
 RAF Bomber Command HU107785.jpg 2,480 × 1,743; 980 KB
-
 RAF Bomber Command HU108387.jpg 800 × 629; 62 KB
-
 RAF Leconfield Sea King.jpg 1,403 × 1,038; 269 KB
-
 RAF rescue helicopter leaves Hull Royal Infirmary - geograph.org.uk - 4196295.jpg 1,600 × 1,200; 459 KB
-

-
 RCAF Halifax bomb load WWII IWM CH 17362.jpg 535 × 800; 38 KB
-
 Royal Air Force 1939-1945- Bomber Command CH6600.jpg 2,480 × 1,637; 876 KB
-
 Royal Air Force 1939-1945- Bomber Command CH7905.jpg 800 × 597; 47 KB
-
 Royal Air Force 1939-1945- Bomber Command CH9331.jpg 599 × 800; 64 KB
-
 Royal Air Force Bomber Command, 1939-1940. C923.jpg 800 × 611; 36 KB
-
 Royal Air Force Bomber Command, 1939-1940. C924.jpg 606 × 800; 67 KB
-
 Royal Air Force Bomber Command, 1939-1940. C925.jpg 610 × 800; 77 KB
-
 Royal Air Force Bomber Command, 1939-1940. C927.jpg 800 × 558; 41 KB
-
 Royal Air Force Bomber Command, 1939-1941. C914.jpg 800 × 607; 38 KB
-
 Royal Air Force Bomber Command, 1939-1941. C916.jpg 800 × 604; 43 KB
-
 Royal Air Force Bomber Command, 1939-1941. C917.jpg 800 × 612; 62 KB
-
 Royal Air Force Bomber Command, 1939-1941. C918.jpg 800 × 607; 57 KB
-
 Royal Air Force Bomber Command, 1942-1945. CE84.jpg 2,310 × 1,772; 906 KB
-
 Royal Air Force Bomber Command, 1942-1945. CE91.jpg 800 × 538; 55 KB
-
 Royal Air Force Bomber Command, 1942-1945. CH10331.jpg 800 × 570; 47 KB
-
 Royal Air Force Bomber Command, 1942-1945. CH10776.jpg 800 × 549; 55 KB
-
 Royal Air Force Bomber Command, 1942-1945. CH11234.jpg 800 × 667; 63 KB
-
 Royal Air Force Bomber Command, 1942-1945. CH11622.jpg 2,303 × 1,767; 834 KB
-
 Royal Air Force Bomber Command, 1942-1945. CH14589.jpg 800 × 611; 58 KB
-
 Royal Air Force Bomber Command, 1942-1945. CH17362.jpg 535 × 800; 51 KB
-
 Royal Air Force Bomber Command, 1942-1945. CH6607.jpg 800 × 541; 73 KB
-
 Royal Air Force Bomber Command, 1942-1945. CH6614.jpg 2,480 × 1,644; 708 KB
-
 Royal Air Force Bomber Command, 1942-1945. CH6640.jpg 2,480 × 1,673; 746 KB
-
 Royal Air Force Bomber Command, 1942-1945. CH7908.jpg 800 × 592; 39 KB
-
 Royal Air Force Bomber Command, 1942-1945. CH7910.jpg 800 × 601; 65 KB
-
 Sea Scout Zero (SSZ) airship at Howden Q27507.jpg 2,480 × 1,510; 1.09 MB
-

-
 Severely Damaged Halifax Gets Back To Base CE82.jpg 800 × 638; 39 KB
-
 SopwithCamelFlyingOffAirshipR23.jpeg 300 × 377; 27 KB
-
 SopwithCamelWithAirshipR23.jpeg 269 × 319; 59 KB
-
 The 303 Polish Fighter Squadron in the Battle of Britain CH1531.jpg 800 × 587; 79 KB
-
 The 303 Polish Fighter Squadron in the Battle of Britain CH1537.jpg 2,389 × 1,772; 1.01 MB
-
 The 303 Polish Fighter Squadron in the Battle of Britain CH1537.png 2,389 × 1,772; 2.98 MB
-
 The Polish Air Force in the Battle of Britain CH1531.jpg 800 × 587; 70 KB
-
 The Polish Air Force in the Battle of Britain CH1533.jpg 800 × 591; 56 KB
-
 The Polish Air Force in the Battle of Britain CH1535.jpg 800 × 574; 108 KB
-
 The Royal Air Force in Britain, February 1943 TR674.jpg 601 × 799; 38 KB
-
 The Royal Air Force in Britain, February 1943 TR675.jpg 598 × 800; 34 KB
-
 The Royal Australian Air Force in Britain, 1943 CH11173.jpg 800 × 617; 81 KB
-
 Whitley tail gunner WWII IWM C 924.jpg 606 × 799; 54 KB
-
 Whitworth tail gunner in turret WWII IWM C 913.jpg 800 × 602; 51 KB


_(2).jpg)
.jpg)


.jpg)
.jpg)


.jpg)
.jpg)
.jpg)
.jpg)


.jpg)

_(25401055504).jpg)
_(25403982913).jpg)
_1933_(archive_ref_DDX1017-1)_(25913108362).jpg)


.jpg)

_1933_(archive_ref_DDX1017-1)_(25913107862).jpg)

.jpg)

_Squadron_RAF_with_one_of_their_Hawker_Hurricanes,_October_1940._CH1535.jpg)
_(25733036770).jpg)


_airship_at_Howden_Q27507.jpg)


