Boydell Shakespeare Gallery
The Boydell Shakespeare Gallery was a collection of pictures commissioned by 18th-century engraver and publisher John Boydell in an effort to foster a school of British history painting. The project contained three parts: an illustrated edition of Shakespeare's plays, a folio of prints from the gallery, and a public gallery where the original paintings for the prints hung. The project was conceived at a dinner in November 1786, the gallery opened in May 1788, and the entire contents were sold and dispersed in 1805.
This Wikimedia Commons gallery collects images of the paintings, engravings, and sculptures generated by Boydell's Shakespeare Gallery.
The lists of art works are taken from Winifred H. Friedman's Boydell's Shakespeare Gallery.
Note: at this point, many images are merely listed, rather than displayed in gallery format.
Sculptures[edit]


Thomas Banks's sculptural group was originally placed above the entrance to the Shakespeare Gallery in 1789. Despite plans to use it as a monument for John Boydell's tomb after his death in 1804, it remained on the building's façade until its demolition in 1868–69. It was then transported to Stratford-upon-Avon and re-erected in New Place Garden in 1870.
Paintings[edit]
Engravings were made from the paintings for either the folio, the illustrated edition, or sometimes both. The order of the plays used here is that from the Illustrated Edition.


Engravings from the Folio[edit]
Dedicatory material[edit]


Volume 1[edit]
-
 Tempest, Act I, scenes 1 - 2 by George Romney
 -
 Tempest, Act I, scene 2 by Henry Fuseli
 -
Tempest, Act IV, scene 1 by Joseph Wright of Derby
-
Tempest, Act V, scene 1 by Francis Wheatley
-
Two Gentlemen of Verona, Act V, scene 3 by Angelica Kauffman
-
Merry Wives of Windsor, Act I, scene 1 by Robert Smirke
-
Merry Wives of Windsor, Act II, scene 1 by William Peters
-
Merry Wives of Windsor, Act III, scene 3 by Matthew Peters
-
Merry Wives of Windsor, Act IV, scene 2 by Thomas Durno
-
Merry Wives of Windsor, Act V, scene 5 by Robert Smirke
-
Measure for Measure, Act I, scene 1 by Robert Smirke
-
Measure for Measure, Act V, scene 1 by Thomas Kirk
-
Comedy of Errors, Act V, scene 1 by John Francis Rigaud
-
Much Ado About Nothing, Act III, scene 1 by Matthew Peters
-
Much Ado About Nothing, Act IV, scene 1 by William Hamilton
-
Much Ado About Nothing, Act IV, scene 2 by Robert Smirke
-
Love's Labour Lost, Act IV, scene 1 by William Hamilton
-
Midsummer-Night's Dream, Act II, scene 1 by Henry Fuseli
-
Midsummer-Night's Dream, Act IV, scene 1 by Henry Fuseli
-
Merchant of Venice, Act II, scene 5 by Robert Smirke
-
Merchant of Venice, Act V, scene 1 by William Hodges
-
As You Like It, Act I, scene 2 by John Downman
-
As You Like It, Act II, scene 1 by William Hodges
-
As You Like It, Act IV, scene 3 by Raphael Lamar West
-
As You Like It, Act V, scene 4 by William Hamilton
-
Taming of the Shrew, Introduction, scene 2 by Robert Smirke
-
Taming of the Shrew, Act III, scene 2 by Francis Wheatley
-
All's Well That Ends Well, Act V, scene 3 by Francis Wheatley
-
Twelfth Night, Act III, scene 4 by Johann Heinrich Ramberg
-
Twelfth Night, Act V, scene 1 by William Hamilton
-
 Winter's Tale, Act II, scene 3 by John Opie, engraved by Jean Pierre Simon
 -
Winter's Tale, Act III, scene 3 by Joseph Wright of Derby
-
Winter's Tale, Act IV, scene 3 by Francis Wheatley
-
Winter's Tale, Act V, scene 3 by William Hamilton
-
Macbeth, Act I, scene 3 by Henry Fuseli
-
Macbeth, Act I, scene 5 by Richard Westall
-
Macbeth, Act IV, scene 1 by Joshua Reynolds
-
As You Like It, The Seven Ages, Act II, scene 7 by Robert Smirke


Volume 2[edit]
- King John, Act IV, scene 1 by James Northcote
- King Richard II, Act IV, scene 1 by Mather Browne
- King Richard II, Act V, scene 2 by James Northcote
- Henry IV, part 1, Act II, scene 2 by Robert Smirke and Joseph Farington
- Henry IV, part 1, Act II, scene 4 by Robert Smirke
- Henry IV, part 1, Act III, scene 1 by Richard Westall
- Henry IV, part 1, Act V, scene 4 by John Francis Rigaud
- Henry IV, part 2, Act II, scene 4 by Henry Fuseli
- Henry IV, part 2, Act III, scene 2 by Thomas Durno
- Henry IV, part 2, Act IV, scene 4 by Josiah Boydell - Prince Henry Taking the Crown
- Henry IV, part 2, Act IV, scene 4 by Josiah Boydell - Prince Henry’s Apology
- Henry V, Act II, scene 2 by Henry Fuseli
- Henry VI, part 1, Act II, scene 3 by John Opie
- Henry VI, part 1, Act II, scene 4 by Josiah Boydell
- Henry VI, part 1, Act II, scene 5 by James Northcote
- Henry VI, part 2, Act I, scene 4 by John Opie
- Henry VI, part 2, Act III, scene 3 by Joshua Reynolds
- Henry VI, part 3, Act I, scene 3 by James Northcote
- Henry VI, part 3, Act II, scene 5 by Josiah Boydell
- Henry VI, part 3, Act IV, scene 5 by William Miller
- Henry VI, part 3, Act V, scene 7 by James Northcote
- Richard III, Act III, scene 1 by James Northcote
- Richard III, Act IV, scene 3 by James Northcote - The Young Princes Murdered in the Tower
- Richard III, Act IV, scene 3 by James Northcote - Burying of the Royal Children
- Henry VIII, Act I, scene 4 by Thomas Stothard
- Henry VIII, Act III, scene 1 by Matthew Peters
- Henry VIII, Act IV, scene 2 by Richard Westall
- Henry VIII, Act V, scene 4 by Matthew Peters
- Coriolanus, Act V, scene 3 by Gavin Hamilton
- Julius Cæsar, Act IV, scene 3 by Richard Westall
- Antony and Cleopatra, Act III, scene 9 by Henry Tresham
- Timon of Athens, Act IV, scene 3 by John Opie
- Titus Andronicus, Act IV, scene 1 by Thomas Kirk
- Troilus and Cressida, Act II, scene 2 by George Romney
- Troilus and Cressida, Act V, scene 2 by Angelica Kauffmann
- Cymbeline, Act I, scene 2 by William Hamilton
- Cymbeline, Act III, scene 4 by John Hoppner
- Cymbeline, Act III, scene 6 by Richard Westall
- King Lear, Act I, scene 1 by Henry Fuseli
- King Lear in the Storm from King Lear, Act III, scene 4 by Benjamin West
- King Lear, Act V, scene 3 by James Barry
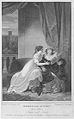
- Romeo and Juliet, Act I, scene 5 by William Miller
- Romeo and Juliet, Act IV, scene 5 John Opie
- Romeo and Juliet, Act V, scene 3 by James Northcote


Engravings from the Illustrated edition[edit]
Volume I
The Tempest
- Act II, scene 4 by Robert Smirke
- Act IV, scene 3 by Robert Smirke
Volume II
The Comedy of Errors
- Act I, scene 1 by Francis Wheatley
- Act IV, scene 4 by Francis Wheatley
- Hero, Usrula, and Beatrice (Act III, scene 1) by Matthew Peters
- Borachio, Conrado and Watchmen (Act III, scene 3) by Francis Wheatley
- Act IV, scene 1 by William Hamilton
- Examination (Act IV, scene 2) by Robert Smirke
- Act V, scene 4 by Francis Wheatley
- Act IV, scene 2 by Francis Wheatley
- Act V, scene 2 by Francis Wheatley
- Puck (Act II, scene 1) by Henry Fuseli
- Puck (Act II, scene 2) by Joshua Reynolds
Volume III
Merchant of Venice
- Act III, scene 2 by Richard Westall
- Act III, scene 3 by Richard Westall
- Jacques and the Wounded Stag (Act II, scene 1) by William Hodges
- Act II, scene 6 by Robert Smirke
- Act IV, scene 3 by Robert Smirke
- Act V, scene 4 by William Hamilton
- Act IV, scene 1 by Julius Caesar Ibbetson
- Act IV, scene 5 by Julius Caesar Ibbetson
- Act I, scene 3 by Francis Wheatley
- Act II, scene 3 by Francis Wheatley
Volume IV
Twelfth-Night
- Olivia, Viola and Maria (Act I, scene 5) by William Hamilton
- Sir Toby, Sir Andrew and Maria (Act II, scene 3) by William Hamilton
- Act IV, scene 3 by William Hamilton
- Leontes and Hermione (Act II, scene 1) by William Hamilton
- Paulina, Child, Leontes, and Antigonus (Act II, scene 3) by William Hamilton
- The Shepherd's Cot (Act IV, scene 3) by William Hamilton
- Act I, scene 3 by Richard Westall
- Act III, scene 4 by Richard Westall
- Act V, scene 1 by Richard Westall
- Act IV, scene 3 by Robert Ker Porter
- Act III, scene 4 by Richard Westall
Volume V
King Richard II
- Act III, scene 2 by William Hamilton
- Act V, scene 2 by William Hamilton
- Act II, scene 1 by Robert Smirke
- Act II, scene 3 by Robert Smirke
- Act V, scene 4 by Robert Smirke
- Act IV, scene 4 by Robert Smirke
- Act V, scene 5 by Robert Smirke
- Act III, scene 3 by Richard Westall
Volume VI
First Part of King Henry VI
- Act II, scene 4 by Josiah Boydell
- Act II, scene 5 by William Hamilton
- Death of Mortimer (Act II, scene 5) by James Northcote
- Joan of Arc and the Furies (Act V, scene 4) by William Hamilton
- Act II, scene 2 by William Hamilton
- Act III, scene 2 by William Hamilton
- Death of Cardinal Beaufort (Act III, scene 3) by Joshua Reynolds
- Act III, scene 2 by William Hamilton
- Act V, scene 5 by William Hamilton
- Meeting of the Young Princes (Act III, scene 1) by James Northcote
- Act III, scene 4 by Richard Westall
- The Young Princes Murdered in the Tower (Act IV, scene 3) by James Northcote
Volume VII
King Henry VIII
- Act I, scene 4 by Thomas Stothard
- Wolsey Disgraced (Act III, scene 2) by Richard Westall
- Act IV, scene 2 by Richard Westall
- Act V, scene 1 by Richard Westall
- Act I, scene 3 by Robert Ker Porter
- Act IV, scene 5 by Robert Ker Porter
- Act III, scene 1 by Richard Westall
- Act V, scene 5 by Richard Westall
- Act IV, scene 4 by Henry Tresham
- Death of Cleopatra (Act V, scene 2) by Henry Tresham
Volume VIII
Timon of Athens
- Act I, scene 2 by Henry Howard
- Act IV, scene 1 by Henry Howard
- Act II, scene 3 by Samuel Woodforde
- Act IV, scene 1 by Thomas Kirk
- Act IV, scene 2 by Thomas Kirk
- Act I, scene 2 by Thomas Kirk
- Act V, scene 3 by Thomas Kirk
- Act II, scene 2 by Richard Westall
- Act II, scene 4 by Richard Westall
- Act III, scene 6 by Richard Westall
Volume IX
King Lear
- Act I, scene 1 by Robert Smirke
- Act III, scene 4 by Robert Smirke
- Act IV, scene 7 by Robert Smirke
-

-
 Act II, scene 5
by Robert Smirke
engraved by James Parker -

-


-
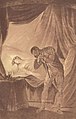 Act V, scene 2
Desdemona Asleep
by Josiah Boydell
